Lab 구성 환경 및 파티션 분할 계획
| OS | Rocky Linux 8 |
| 디스크 타입 | NVMe |
| 파티션 타입 | primary |
| 디스크 크기 | 20G |
| 디스크 분할 |  |
※ NVMe 특징:
데이터 전송 방식: 직렬 전송
최대 전송 속도: 70000MB/s
지연 시간: 0.1µs
비     용: 비싸다
호환성 드라이브: SSD
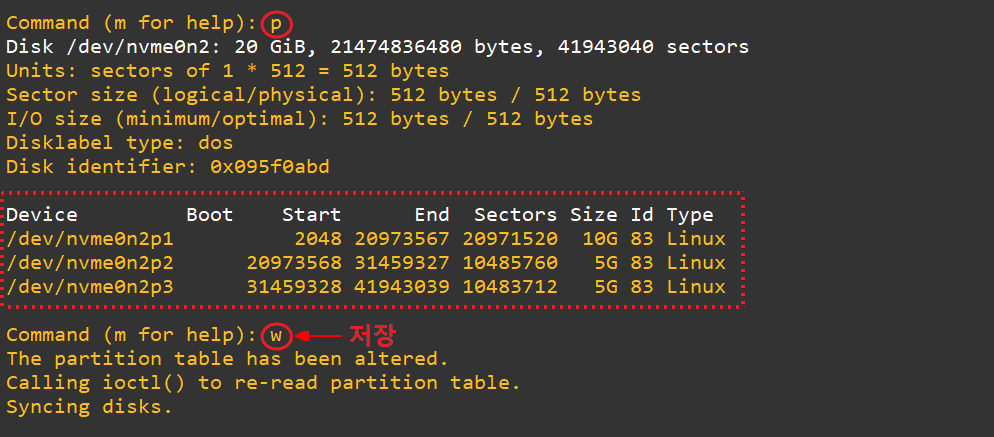
1. fdisk -l 명령어를 통해 장착한 Disk 확인
2. fdisk /dev/nvme0n2 명령어를 통해 추가한 디스크 파티션 나누기
- Generic : n 키를 눌러 파티션 추가하기
- Save & Exit : 파티션 추가 후, w 키를 눌러 저장하기
3. n 키를 눌러 '새로운 파티션' 추가 > 파티션 타입 : p(primary) 키 또는 엔터를 눌러 10G 설정 및 설정 확인
4. 위 방법으로 5G 2개를 분할 계획대로 설정 후 p키를 눌러 확인 후 w키를 눌러 저장
5. 파티션된 디스크를 xfs 파일 시스템으로 생성(포맷) 하기
- mkfs 명령어로 xfs 파일시스템 생성
[root@localhost ~]# mkfs.xfs /dev/nvme0n2p1
meta-data=/dev/nvme0n2p1 isize=512 agcount=4, agsize=655360 blks
... 생략 ...
realtime =none extsz=4096 blocks=0, rtextents=0
[root@localhost ~]# mkfs.xfs /dev/nvme0n2p2
meta-data=/dev/nvme0n2p2 isize=512 agcount=4, agsize=327680 blks
... 생략 ...
realtime =none extsz=4096 blocks=0, rtextents=0
[root@localhost ~]# mkfs.xfs /dev/nvme0n2p3
meta-data=/dev/nvme0n2p3 isize=512 agcount=4, agsize=327616 blks
... 생략 ...
realtime =none extsz=4096 blocks=0, rtextents=0
6. 마운트 할 디렉터리 생성: partition1, partition2, partition3

7. 생성한 3개 디렉터리에 mount 명령어를 사용해 xfs 파일 시스템 마운트(연결)
- t 옵션: 파일 시스템 유형 지정

8. mount 명령어를 통해 현재 마운트 된 정보 확인
[root@localhost ~]# mount
proc on /proc type proc (rw,nosuid,nodev,noexec,relatime)
/dev/nvme0n1p1 on /boot type xfs (rw,relatime,seclabel,attr2,inode64,logbufs=8,logbsize=32k,noquota)
... 생략 ...
/dev/nvme0n2p1 on /root/partition1 type xfs (rw,relatime,seclabel,attr2,inode64,logbufs=8,logbsize=32k,noquota)
/dev/nvme0n2p2 on /root/partition2 type xfs (rw,relatime,seclabel,attr2,inode64,logbufs=8,logbsize=32k,noquota)
/dev/nvme0n2p3 on /root/partition3 type xfs (rw,relatime,seclabel,attr2,inode64,logbufs=8,logbsize=32k,noquota)
[root@localhost ~]#
9. df 명령어를 통해 파일 시스템 이름, 크기 및 마운트된 위치 확인
[root@localhost ~]# df -h
Filesystem Size Used Avail Use% Mounted on
devtmpfs 351M 0 351M 0% /dev
... 생략 ...
/dev/nvme0n2p1 10G 104M 9.9G 2% /root/partition1
/dev/nvme0n2p2 5.0G 68M 5.0G 2% /root/partition2
/dev/nvme0n2p3 5.0G 68M 5.0G 2% /root/partition3
[root@localhost ~]#
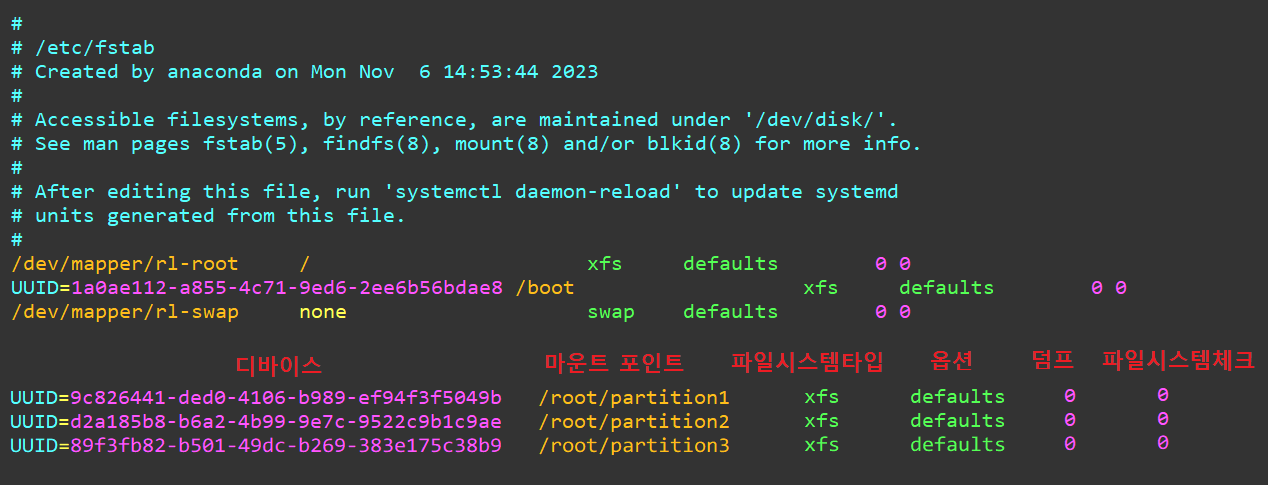
10. 영구적 마운트 설정 하기
/etc/fstab
- file system table의 약자로 부팅할 때 /etc/fstab을 읽어서 디바이스 장치를 마운트포인트에 옵션에 적혀있는데로 연결
- 6개 필드: 디바이스 | 마운트포인트 | 파일시스템타입 | 옵션 | 덤프 | 파일시스템체크
* 디바이스: 장치명(/dev/sdc1), 라벨명(/root/DIR1), UUID 3개 중, 충돌을 고려해 UUID 번호 사용
* 마운트포인트: 어떤 디바이스가 어떤 디렉터리에 연결되어 있는지에 대한 정보
* 파일시스템타입: 파일시스템에 대한 정보
* 옵션: defaults 기본으로 지정
defaults는 아래 기본 옵션을 모두 사용하도록 지정
  . 옵션 필드의 defaults 는 가장 기본적인 파일시스템에서 사용되는 속성
  . defaults options: rw, suid, dev, exec, auto, nouser, and async. (rsdeana)

rw: 읽기, 쓰기를 사용할 수 있는 옵션 (반대: ro)
suid: setuid, setgid 사용할 수 있는 옵션 (반대: nosuid)
dev: 문자, 블럭 장치 사용할 수 있는 옵션 (반대: nodev)
exec: 실행 파일을 실행할 수 있는 옵션 (반대: noexec)
auto: 부팅시 자동 마운트할 수 있는 옵션 (반대: noauto)
nouser: 일반 사용자들은 마운트 할 수 없고 관리자 root만 mount 할 수 있는 옵션 (반대: user)
async: 파일시스템에 대한 입출력이 비동기할 수 있는 옵션 (반대: sync)

※ 특별한 경우가 아니라면 /etc/fstab 필드에 옵션 부분에는 defaults가 들어간다.
* 덤프: CentOS 7, Rocky 8 에서는 0을 기본으로 지정
* 파일시스템체크순서: CentOS 7, Rocky 8 에서는 일반적으로 0을 기본으로 지정
팁!!
vi 편집기에서 실행모드(:)에서 r 입력후 !blkid | grep /dev/nvme0n2 작성하면 UUID 을 삽입해서 쉽게 편집
- blkid 명령어: 블록 장치의 속성을 표시하는 명령어
- 파일 시스템 유형
- 파일 시스템 UUID
- 볼륨 레이블
- 장치 ID
- 장치 크기
- 장치 상태
10. /etc/fstab 파일 내용 추가 후, 추가 내용대로 다시 마운트하기
- mount -a
- 내용 확인

참고: fdisk 최대 파티션 크기는 2T 이다. 그래서 7.8T를 파티션 할 수 없으니 GPT를 사용하라.는 내용을 볼 수 있다.
nvme0n3     259:7    0  7.8T  0 disk
[root@Rocky8 ~]# fdisk /dev/nvme0n3

Welcome to fdisk (util-linux 2.32.1).
Changes will remain in memory only, until you decide to write them.
Be careful before using the write command.

Device does not contain a recognized partition table.
The size of this disk is 7.8 TiB (8589934592000 bytes). DOS partition table format cannot be used on drives for volumes larger than 2199023255040 bytes for 512-byte sectors. Use GUID partition table format (GPT).

Created a new DOS disklabel with disk identifier 0x479dcaf0.

Command (m for help):